I have a drive and desire to do things myself, if at all possible. Especially car, house, and bike related.
F or many years, I regarded bicycle wheelbuilding and truing as an unlearnable black art and ignored it. I would only buy complete wheelsets, and on the rare occasion of a broken spoke or hub issue, I’d take it into the local shop. After severely damaging a rear wheel last year and buying a whole new wheelset, I decided enough was enough. I was going to learn to build and maintain bike wheels.
As is common for me and a new subject, I hit the interwebs hard and suck up every speck of info. What I learned is that wheelbuilding is indeed a bit of an art, but there is also a very measurable and precise science to it. That intrigued even more. What I also figured out is that most of the information and discussions on the internet (especially the forums) are full of obsolete, anecdotal, or flat out incorrect myths and "advice". Shocking, right? I am obviously no seasoned expert wheelbuilder, but if you spend enough time reading and researching a topic from reputable sources and books, it becomes easier to smell the bullshit. Which reminds me of a Barenaked Ladies song quote I love: "I don't buy everything I read, I haven't even read everything I've bought."
After reading Roger Musson’s venerable and digestible "Professional Guide to Wheel Building" as well as Jobst Brandt’s admittedly old-school "The Bicycle Wheel", I felt pretty well informed of both the hands-on procedures and the concepts behind it. Jobst (RIP) was legendary and wrote his definitive book on wheelbuilding in 1981. I can’t help but think that some of his concepts and sage advice are a bit dated now over 35 years later; where bicycle technology has seen substantial advances. In any case, reading Jobst’s online rebuttals and explanations on old mailing list archives provides a lot of insight and background knowledge.
I would also be remiss if I didn’t mention Ric Hjertberg who, along with his brother, created and ran the legendary Wheelsmith shop in California for 25 years. He also had a stint working at FSA and starting up Mad Fiber, a former carbon fiber wheel manufacturer. These days, Ric runs Wheel Fanatyk, a blog and boutique wheelbuilding online store. His blog is full of valuable info from one of the industry’s greatest wheelbuilders and tinkerers.
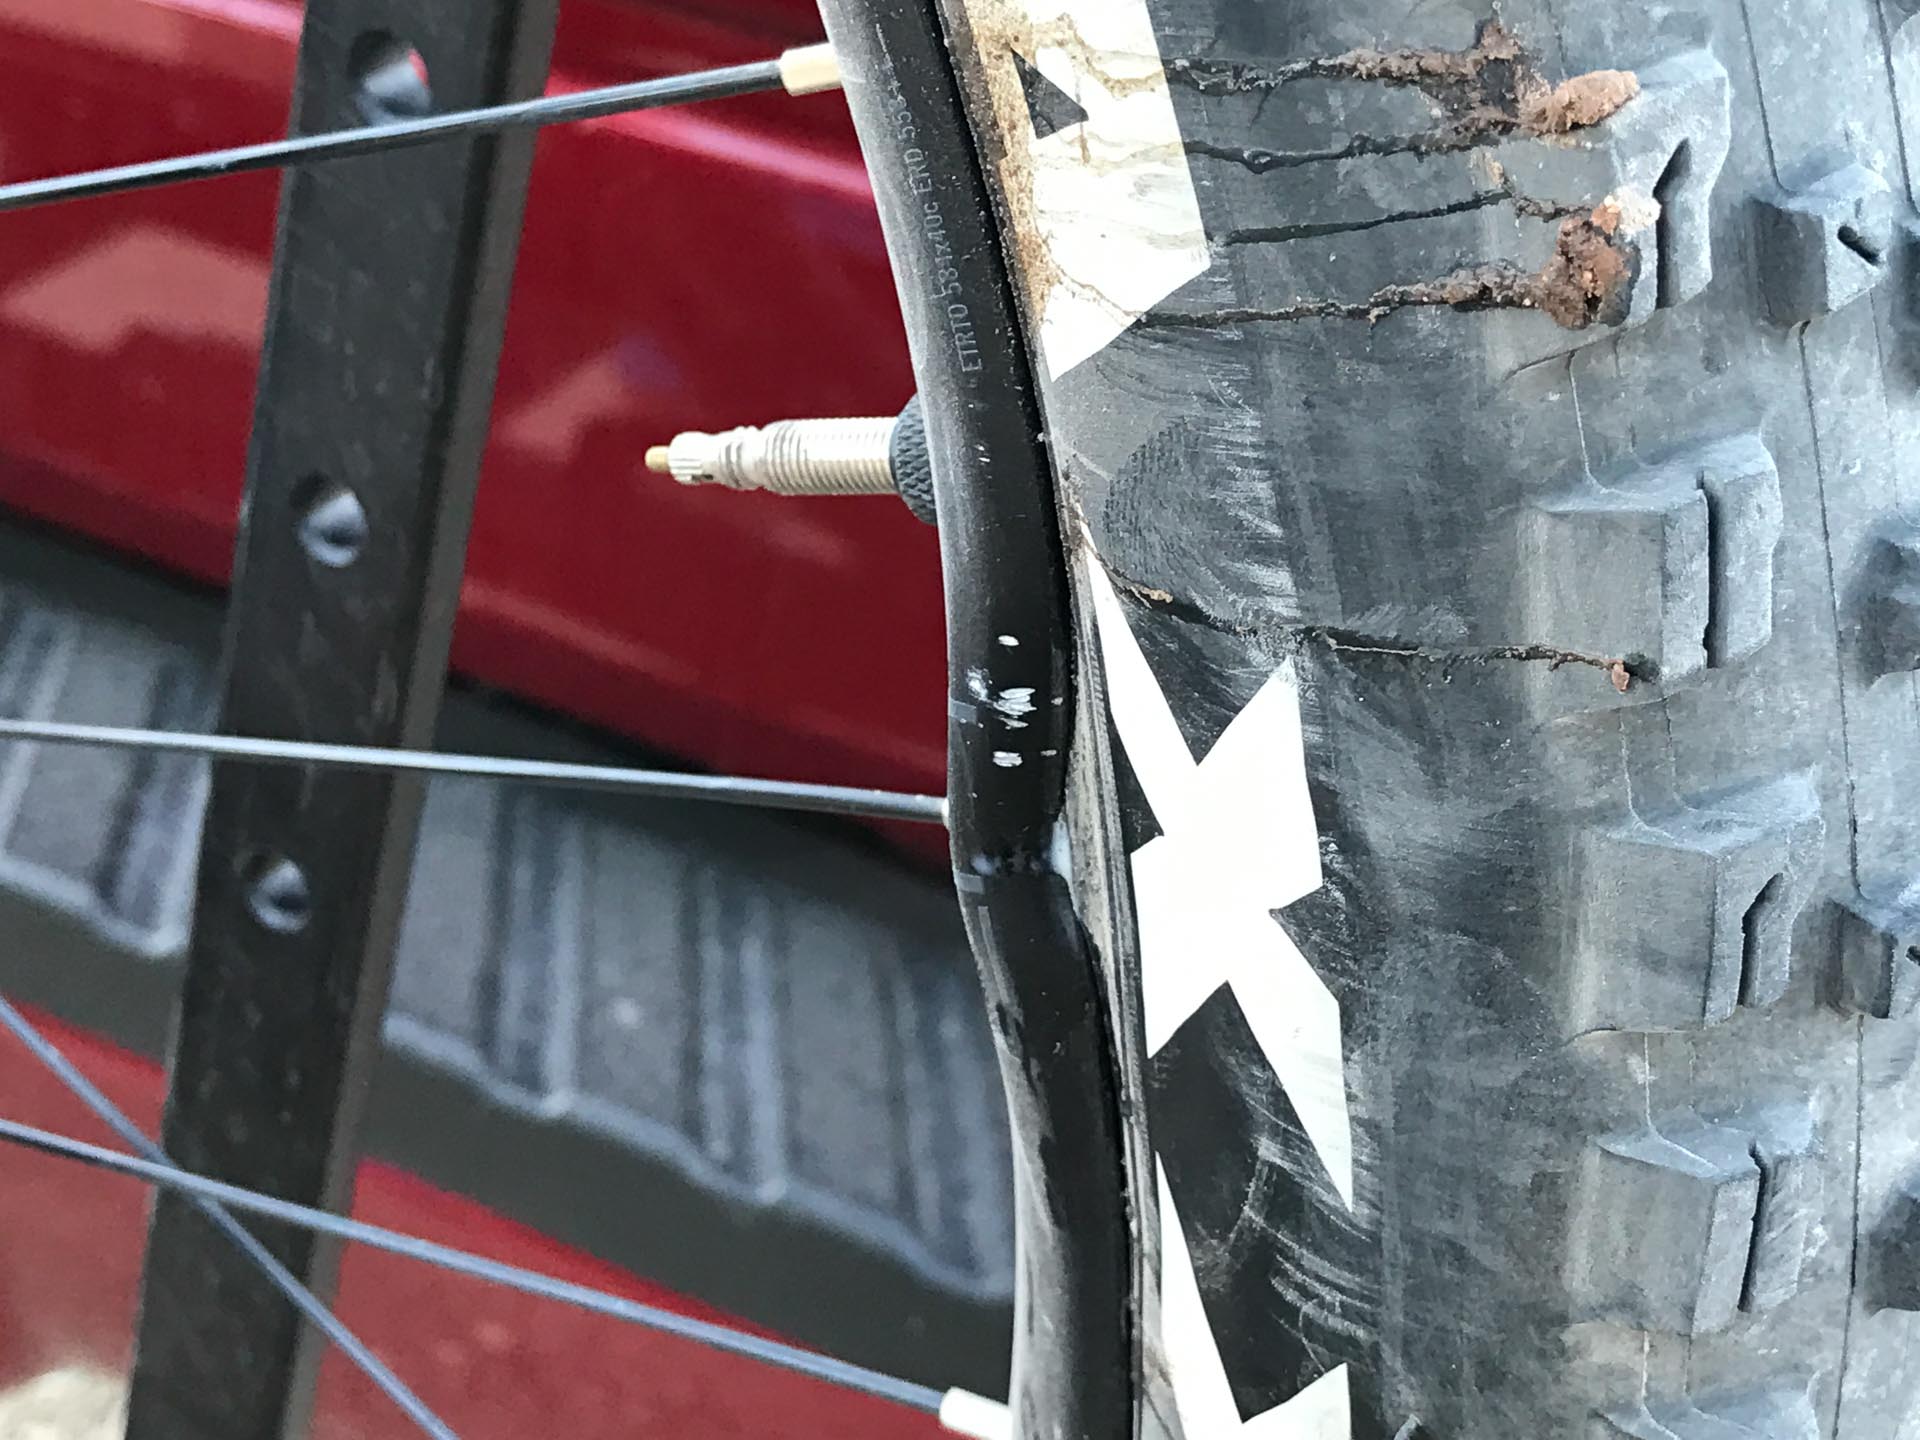
With all that info swirling in my head, I took the plunge with the venerable Park Tools TS2.2 Truing Stand. The TS2.2 can be found in thousands of garages and well-worn bike shops. I had it fully kitted out with the base, centering alignment tool, micrometer gauges, etc. I was almost immediately disappointed in the quality of it though. While the stand is heavy and sturdy feeling, it also feels very "Made in China" and not a precision instrument to build $2000 wheelsets with. There was copious amounts of cheap stamped steel and plastic knobs with the decals already falling off. The accessory plastic base felt super cheesy; I had to hammer it into place on the metal stand, which then sheared off bits of plastic. I also wasn’t a fan of the fundamental design in which the calipers are meant to drag and scrape against the wheel’s surface. To their credit, Park does supply hard plastic caps that clip on to the caliper tips to protect the rim surface from scratching. However, the tips were not a secure fit and had more than 1mm of play in them.
Unfortunately, it is necessary to purchase Park’s $70 centering "gauge" to allow you to center the caliper arm against the stand's uprights. Without being able to center the uprights, wheel dish will always be off, and you’ll have to constantly be checking a wheel with a dishing gauge—slowing things down considerably. Centering the uprights quickly revealed that the arm itself was not square against the stand's wheel axle holder. Meaning that when you screwed the arm in and out to accommodate different sized wheels, the calipers themselves did not stay centered in relation to the axle. So every time I put in a different sized wheel, or moved the caliper arm, I would have to break out the centering tool and re-center the arm. What a pain. It should also be mentioned that the centering process and locking of the uprights seemed very unreliable and janky. Similarly, since both caliper jaws move with only one central screw knob, there is no way to tell if the caliper jaws move equally when you adjust their opening width for wider/skinnier rim widths. If any of those pieces—caliper jaws, main caliper arm, axle uprights—are not in perfect alignment, you’ll quickly end up with dishing and truing problems, not to mention loads of wasted time.
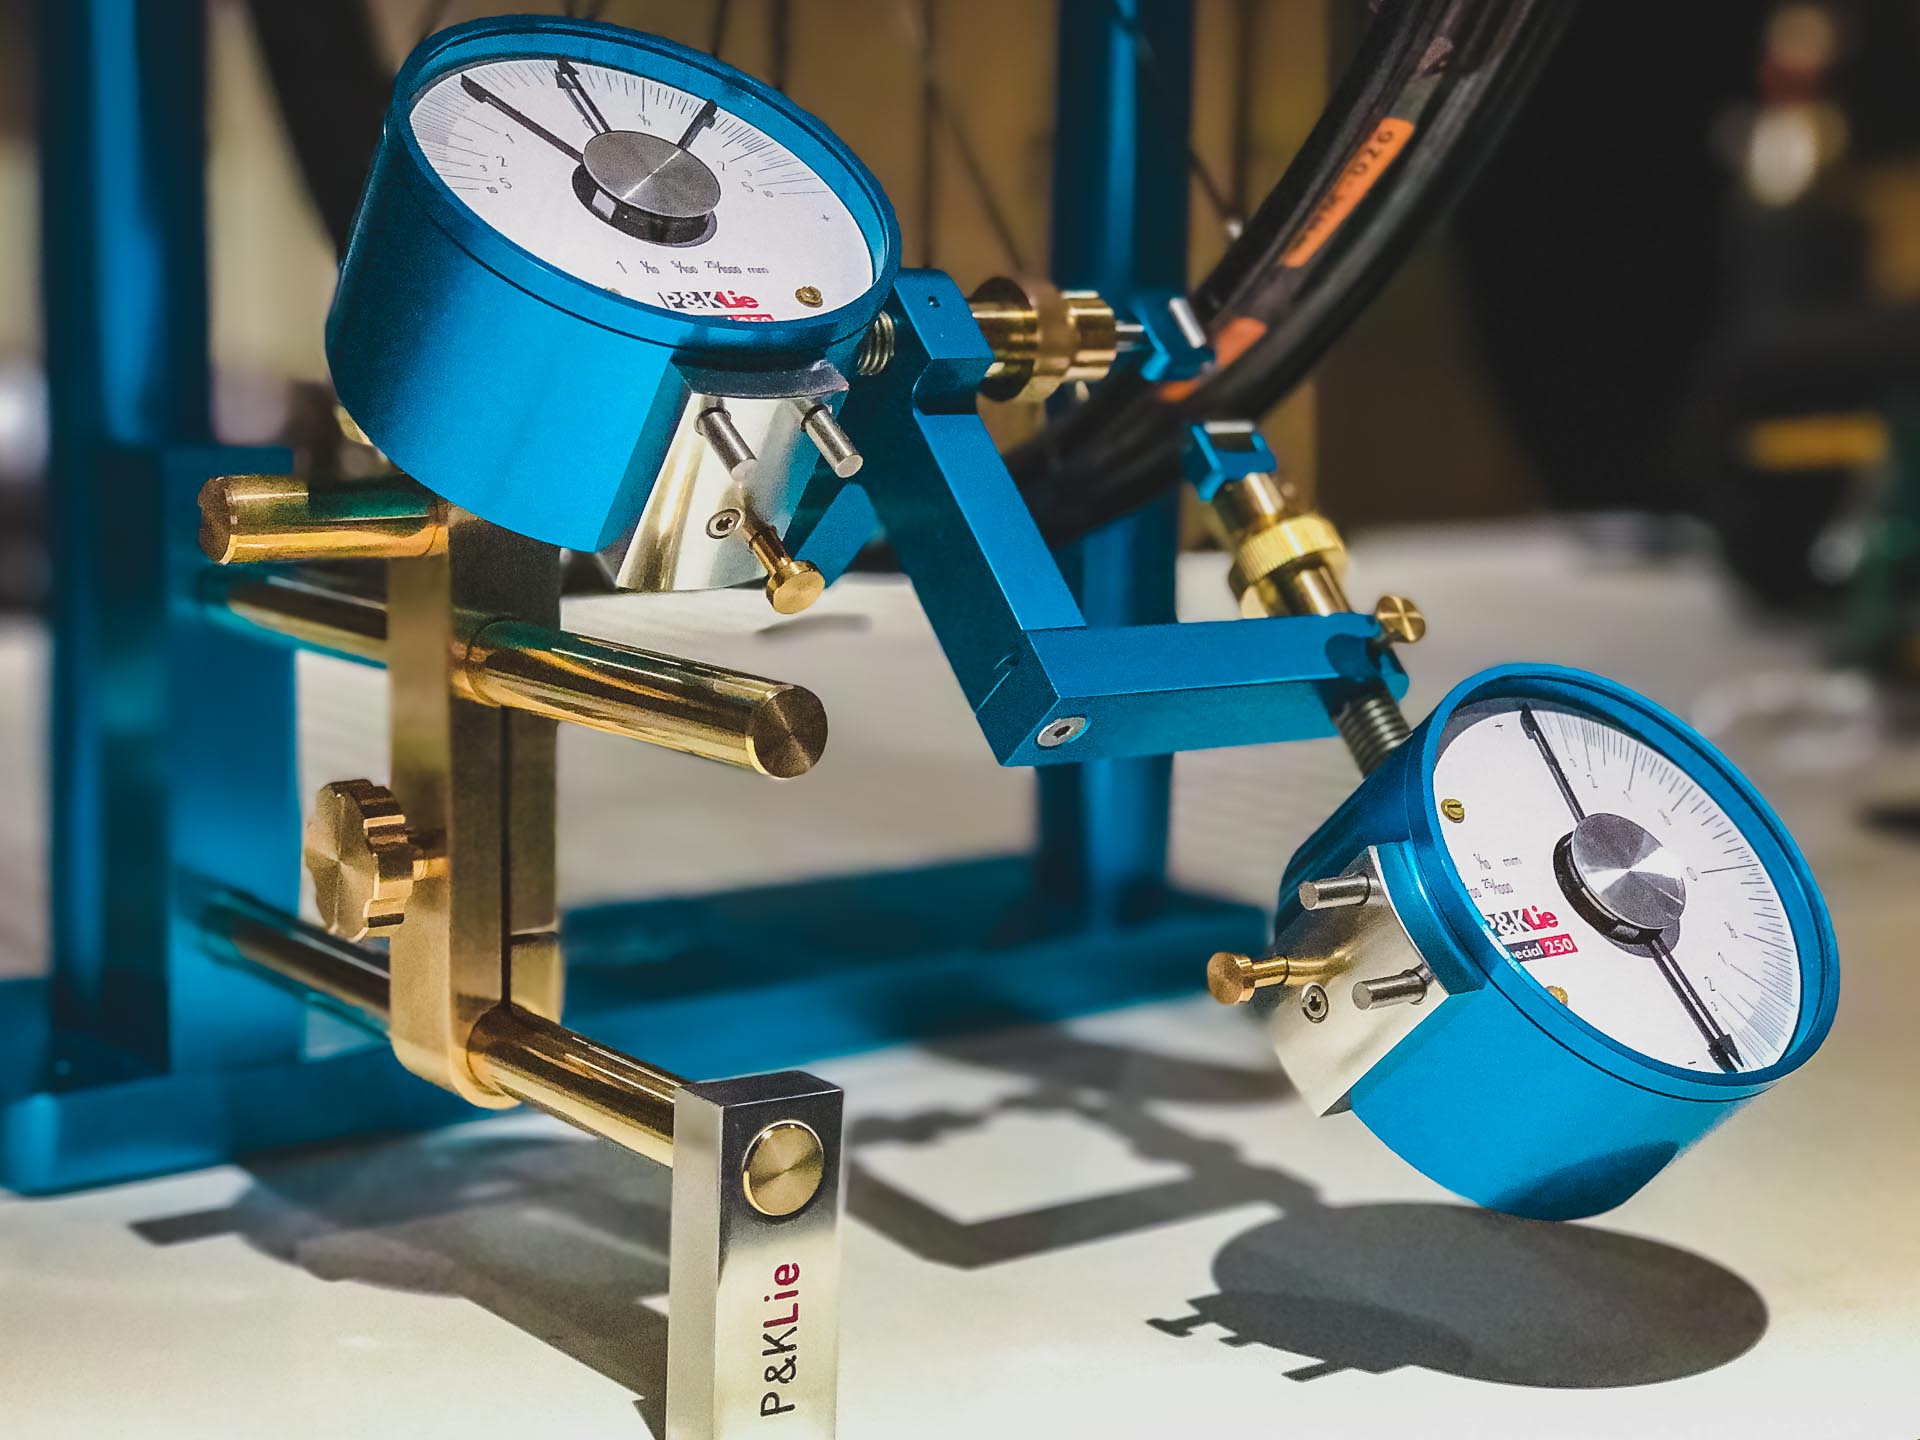
I ended up returning the Park Tools stand. If I was going to get into wheelbuilding, it was going to be with the proper tools and a decent level of precision and repeatability. This is where Ric at Wheel Fanatyk and P&K Lie came in. The P&K Lie Truing Stand is made in Germany in small batches out of aluminum and brass; no plastic to be found. There are two models of P&K’s truing stand: the 250, and the 05. The only difference is the level of precision in the gauges, the stands are otherwise identical. The 05 measures down to 0.05mm (0.0019″), less than 1/5 the thickness of a sheet of paper. The 250 doubles that accuracy and is able to measure down to 0.025mm (0.00098"). Sounds insane right? If you’ve ever used a precision dial indicator gauge before (found on Park Tools, Centrimaster, DT Swiss, and other truing stands), you’ll be familiar with the needle arm that spins round-and-round 360° and is very difficult to read. If you’re not familiar, here’s a cool simulator for reading a traditional dial indicator.
The P&K stands, however, use non-linear sweep gauges, which are very different than those traditional indicator dials. The P&K has two sensors, clocks, or gauges; I’ve seen them called a number of terms. One for measuring lateral true (side-to-side runout or wobble of a wheel) and one measuring radial true (up and down wobble, if the wheel is out of round). Both gauges are identical, except the radial gauge is rotated perpendicular to the lateral. The needle on each can sweep back and forth a maximum of 160°. On the main lateral gauge, the needle points directly up in the center when it's at 0mm. The needle will sway left when the rim moves to the left, and sway right when the wheels bows out to the right. This makes it incredibly intuitive and fast for truing.
"Nothing about P&K is intentionally luxurious, except function. This is the beauty of a vintage Bridgeport mill, a Graziano lathe. These are not made to impress neighbors from a driveway. This is about quality, longevity, speed, and the joy of fabrication at the highest level."
- Wheel Fanatyk
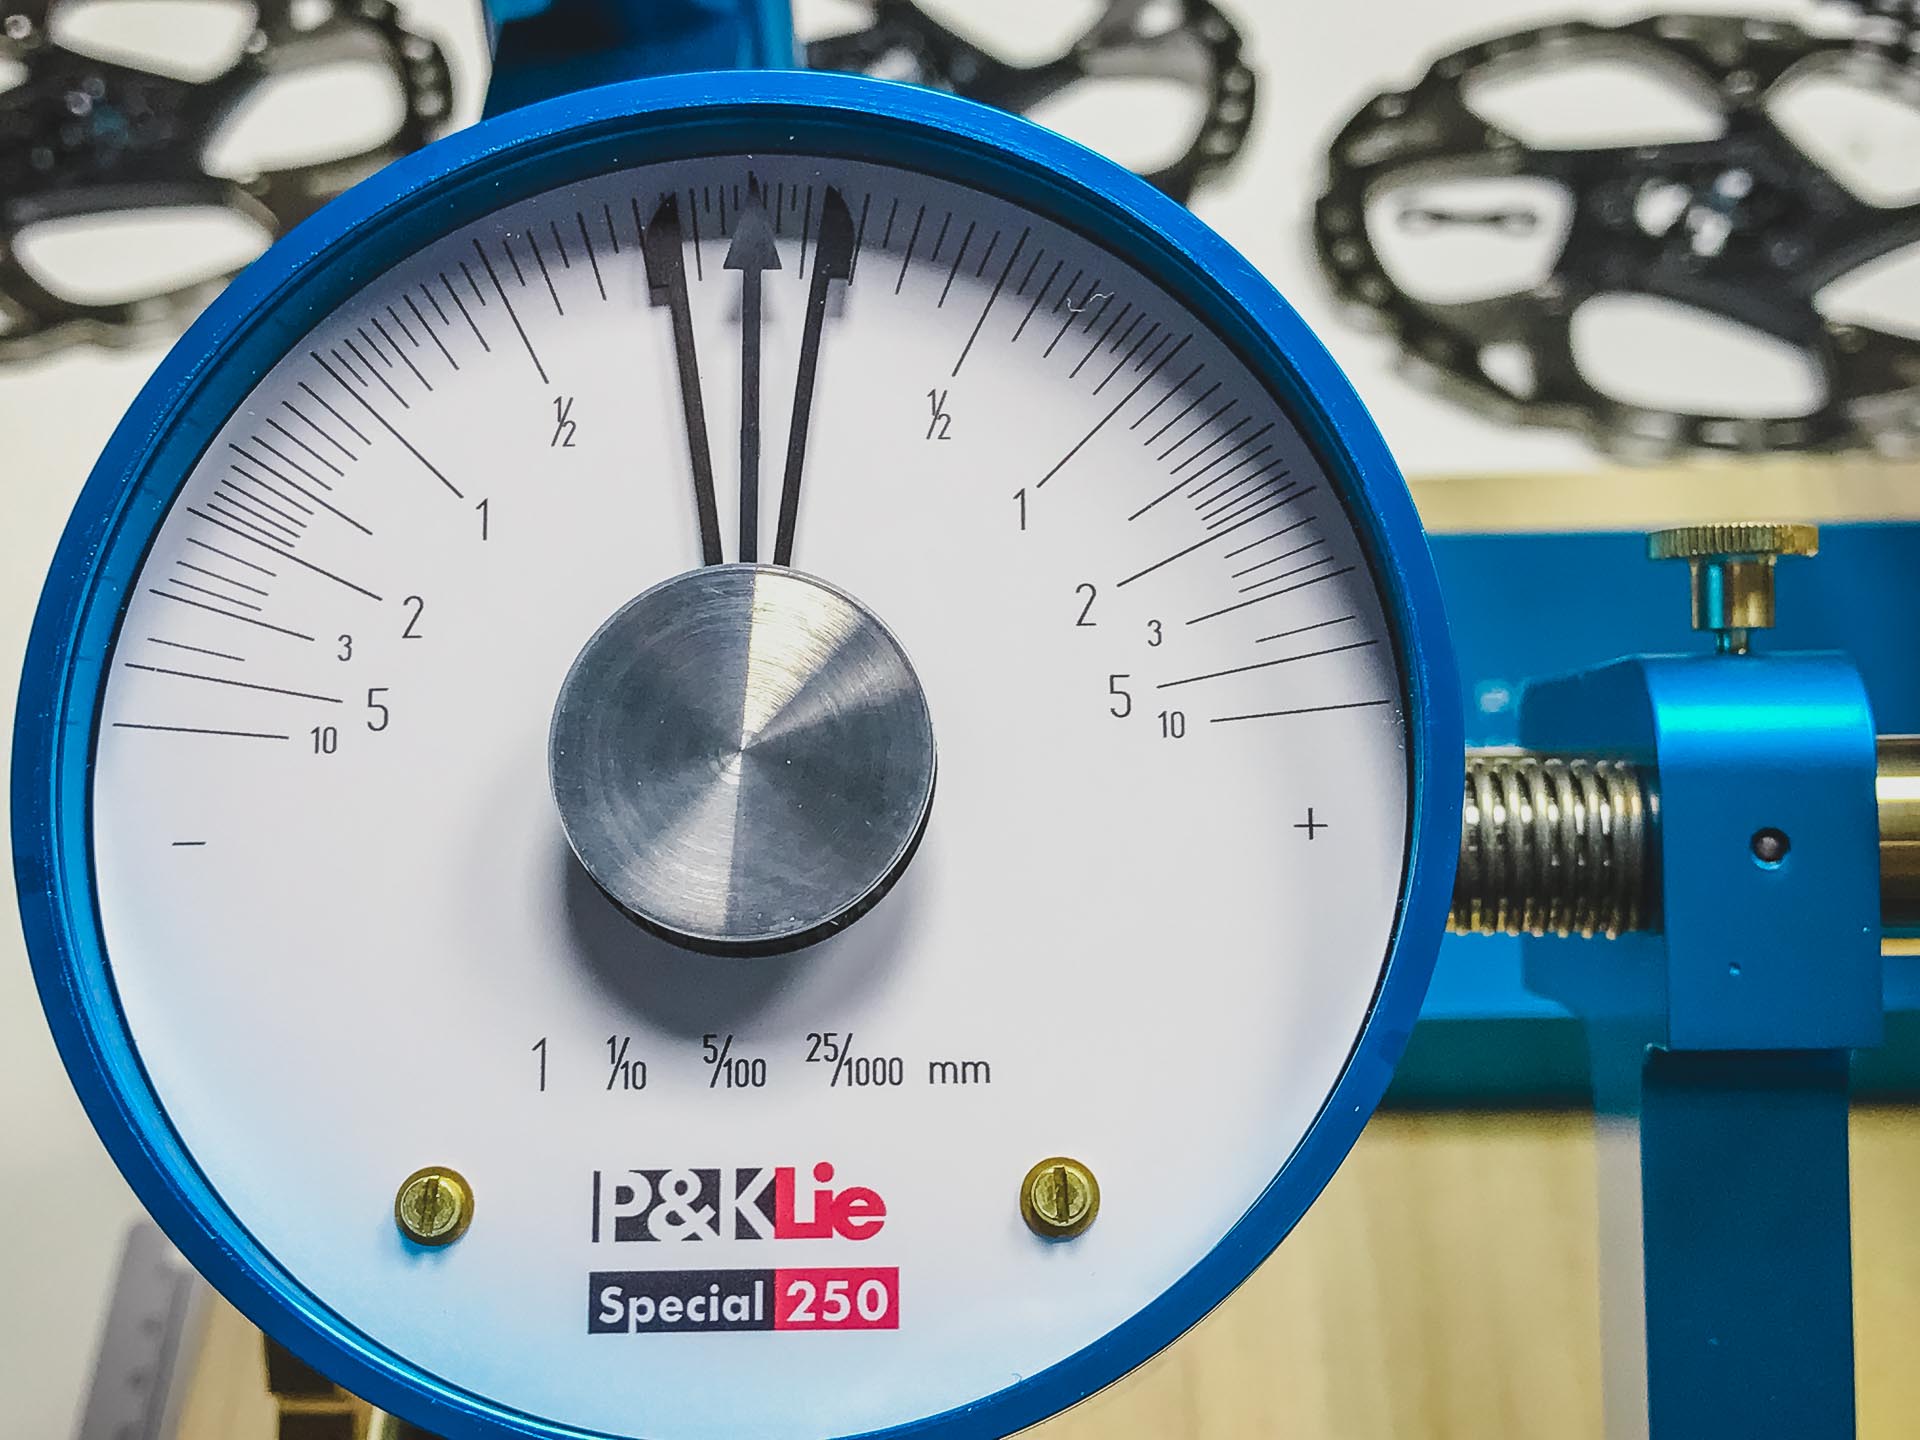
To get the astounding 0.025mm resolution, and still have a full +/- 10mm of range, the gauge is non-linear. This means that the closer the needle is toward the center, the higher the resolution and the more sensitive it is. You can very easily see even slight finger pressure on the wheel reflected in the gauge needle. This is hard to explain, and best left to a visual to see the gauge markings and function. Below is a photo of the clock face, with the needle pointing almost directly on 0mm and each drag pointer at just less than 0.15mm. On either extreme of the face is the 10mm marking, with 5mm coming next. After 5mm, the needle starts covering an ever larger sweep distance on the gauge face for a smaller distance reading of wheel movement. For example, on the clock face, the needle moves about the same distance from 5mm to 10mm as it does from 1.5mm to 2mm. Here’s a rather crappy video that P&K made about using the truing stand, but you can see the gauges in action.
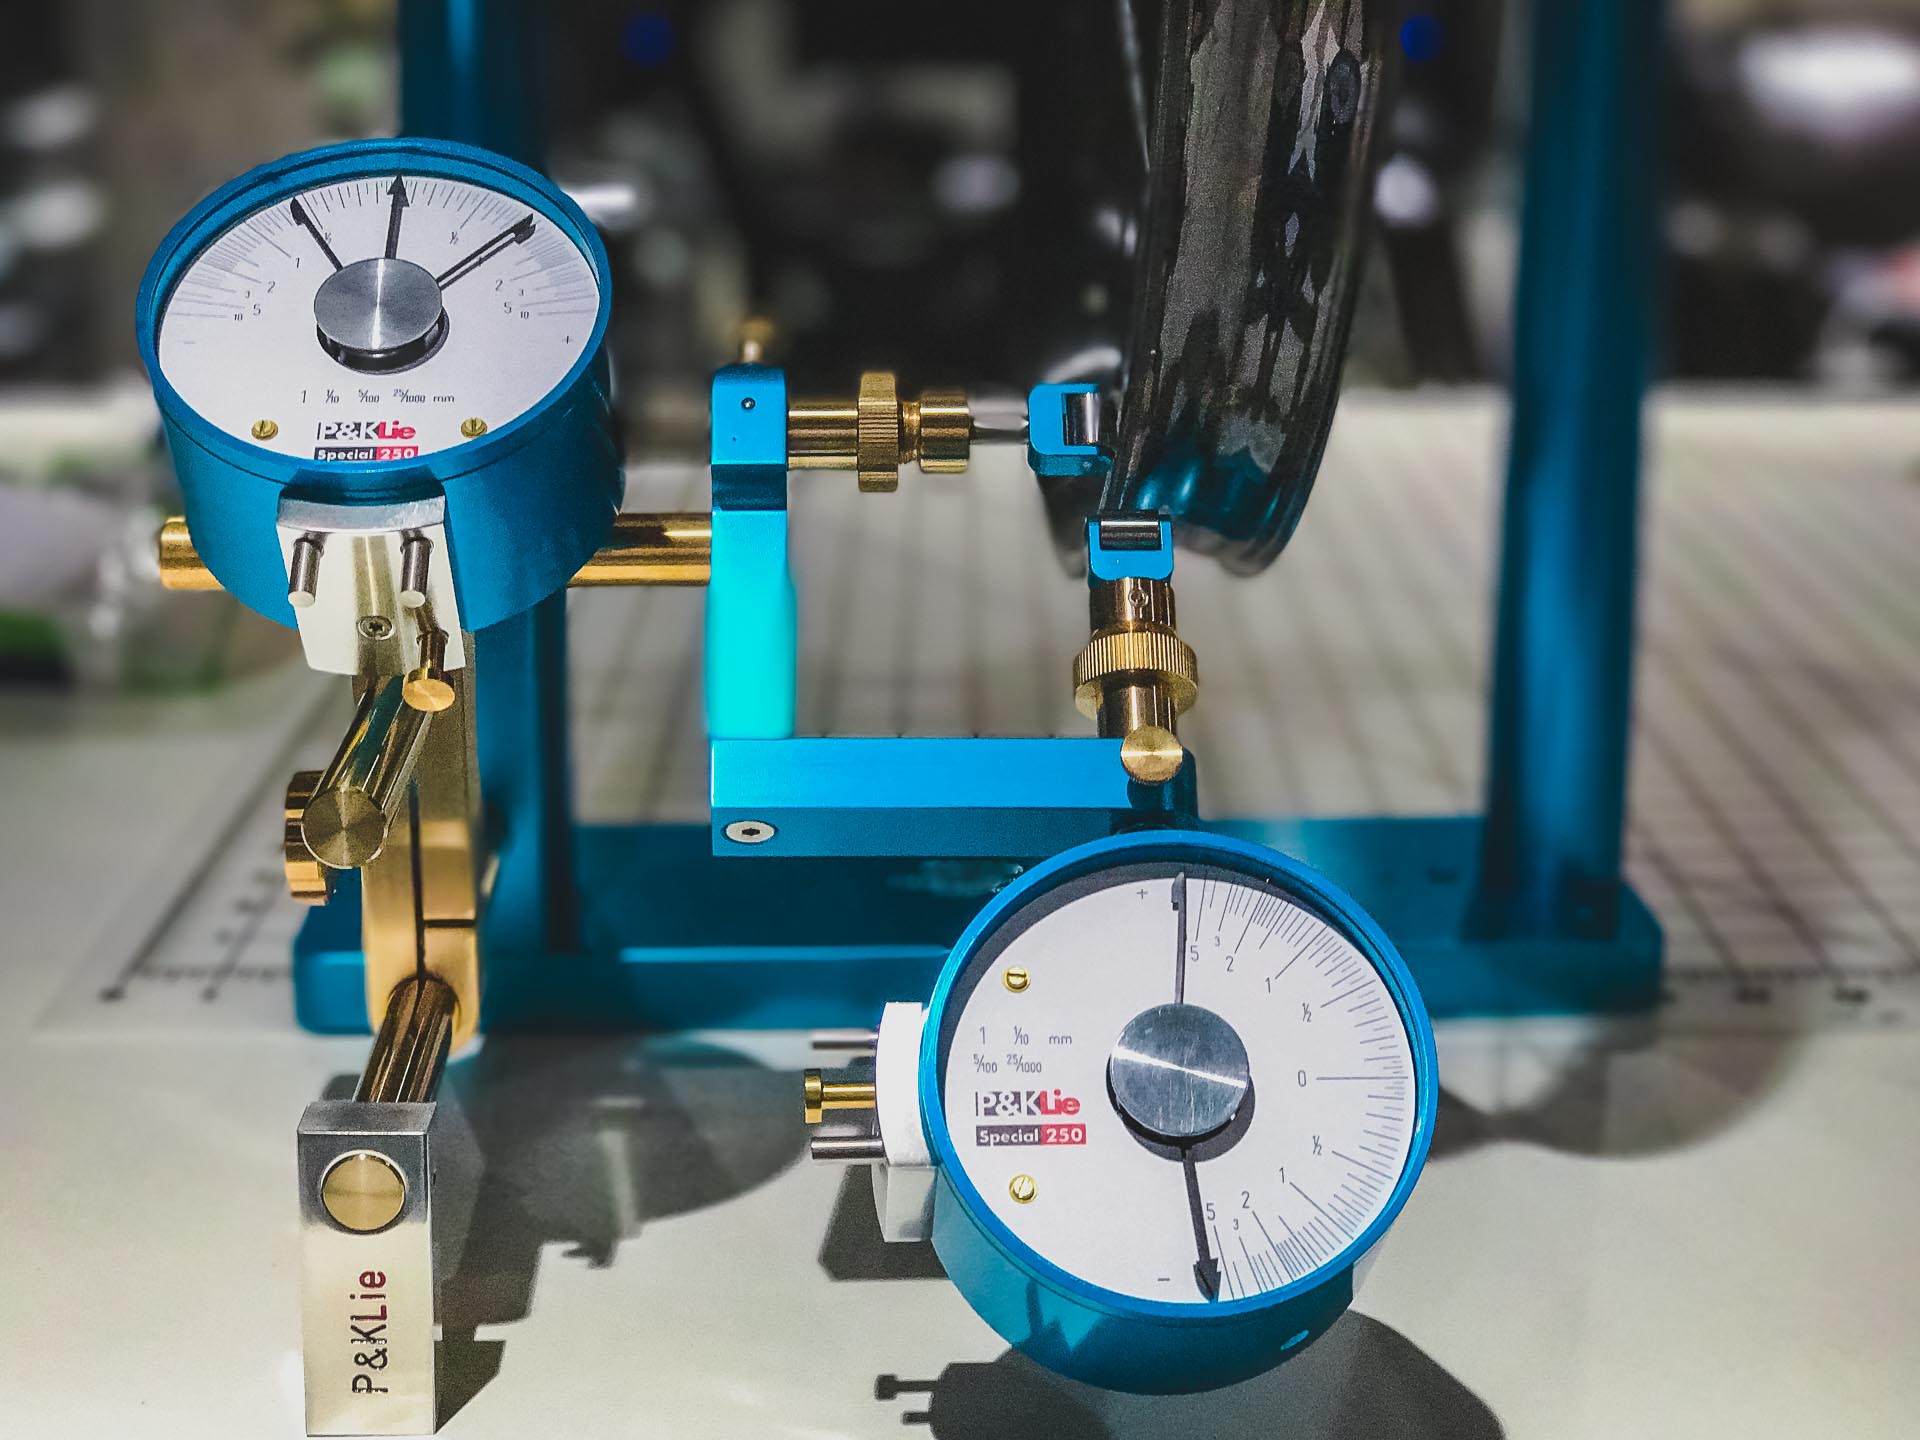
Because of the unique way these gauges work, and the overall precision of the stand, you no longer need a dishing gauge. I was very skeptical of this at first, but after testing it out, it is indeed true. Before you begin truing a wheel, you go through a quick process of setting the gauge sensor against the rim at the valve hole and mark that position by zeroing the gauge to that position. Then you flip the wheel around in the stand and take note of where gauge sensor is reading at the same spot (the valve hole). By then readjusting the zero point of the gauge to 1/2 the difference between the first side reading and the second side reading, you get the dead center of where the wheel should be to be properly dished. This may sound confusing—and this process is not found on any other truing stand I’ve used—but after doing it a time or two and understanding what is happening, it’s a piece of cake.
After finding your zero point (where the edge of the rim should sit in order for the wheel to be dished properly), the non-linear gauges make it super easy to take a sweep of the wheel and see what kind of shape it’s in, both laterally and radially. It should be noted that the gauges also have resettable drag pointers, so you can see the high and low points of where the needle has been. This makes it fast and easy to go around the entire wheel once and immediately see the lateral and radial status of the wheel. You can then find the areas of the wheel with the greatest deflection and start to bring them back into true while watching the measurement on the gauge. It’s hard to understate just how intuitive and quick—not to mention accurate—this makes wheelbuilding and truing.
In future posts, I’ll go over some more wheelbuilding details like spoke twist (hint hint, site title), spoke tension, nipple oil vs. Loctite, and more.


13 Comments
Where on the Front Range are you!? I want to ogle your stand!
Regarding the TS-2.2, I couldn’t agree more. The issues with it apply to most stands out there, which is why I use a one-armed Ultimate (now Feedback) stand at home. The only downside to it is that dish needs to be done with an external gauge, and through-axle wheels are a pain. I still enjoy using it much more than a Park.
Hey Archer! I’m in Fort Collins. You are totally welcome to come ogle the stand. “She’s a beaut Clark!”
I’ve never used a one-armed stand before. The speed and precision of the P&K is something to behold though.
Hi,
Very nice pictures of the PK Lie truing stand, I have one myself.
Indeed, the instructions video from PKLie itself is rather crapy, the only one I found sofar on the net is this one: https://www.youtube.com/watch?v=jsCQpeKutxM&list=PLQcWxG2X2CLLQqfHu717-b-ZC3QO4JlcQ&index=26
Hopefully you make an even better version, I visited your website JMVDIGITAL, great stuff !!
I also have the drive to maintain every part of my mountainbike by myself, that’s why I recently started to learn wheelbuilding
Ronny
Ronny (from Belgium)
Thanks Ronny! Ric from Wheel Fanatyk was supposedly working on a video(s) about the P&K stand. I haven’t heard anything in a while though.
Keep on wrenching!
Hoping the plan to continue with more wheelbuilding posts is still alive and well. Really awesome first one here on the P&K…
Thanks Ryan!
Thanks for the tip on dish – split the difference in run out by the valve hole. I use a Roger Musson type of stand I made, the key to it being the precision of the alignment of the “V” slots – which Roger doesn’t have in his design. Since the quick release skewer squishes the wheel’s axle a bit, I clamp the wheel to the stand. The P&K Lie expects you to be willing to do a snug cone adjustment for their stand and then after truing get back to the precise amount of play the clamped skewer will remove. This could be seen as an improvement over the P&K Lie.
Hmm. I see your point. But a tiny bit of extra tension on the bearings results in an extremely small difference though, especially for dish. We’re talking sub-millimeter, which is well within the dish tolerances of many (if not all) factory new wheels. If you really wanted, you can manually compress the v-blocks of the P&K against the wheel as you lock down the axle width adjustment. That wouldn’t be as tight as a skewer, but it would likely be enough to take most, if not all, measurable runout I would think. I haven’t tested it. And for a thru-axle wheel, you actually used their screw-in adapter, which would create sufficient skewer-like pressure to remove bearing play.
And I see your point. I added pix of my D.I.Y. truing stand to https://metarhyme.wordpress.com/about/ and while it may produce really nice wheels, it does scrape scrape scrape to get there. Also, it doesn’t have the beauty of the P&K Lie – no doubt about that.
+1 on showing it in the box. I could use a video on re-packing it, as I am moving, and am having a hard time getting it all to fit back in correctly.
Hi.
Im just wondering what steps you take in using the P&K stand. I purchased one and have watched the video and had email contact with Peter, and Ric from fanatyk. Biggest question I have is what are you doing with all the other spokes when you are making the adjustment to the one spoke at the sensor. I did recently see a video where the. builder did the majority of the build in a park truing stand and at the end is when he went to the P&K. I have tried using the stand and building to the point where I equalize spoke tension on both sides and then use the stand. Thanks for any input
Kent
Hey Kent, to be honest, I think you need to dig more into wheel building basics. What you’re asking (what are you doing with all the other spokes when you are making the adjustment to the one spoke at the sensor) is not particular to the P&K workflow at all, but a more general question about how to tension and true a wheel. Highly recommend Jobst Brandt’s The Bicycle Wheel. PDF can be found here, or you can purchase a book form from Sheldon Brown’s website I believe.
Thanks for responding and perhaps I phrased my question the wrong way. I have built many wheels and use Roger Mussons book for reference when needed and also have read Jobst Brandts book as well. The person that I build wheels for is really big into the tapeless rims and I have come up with various ways to get the nipples into position as well as ways to control the nipple while trying to thread it onto the spokes. I have been using/practicing different ways to build using the stand and have it pretty well figured out. My question stems from the rather old video that shows Kristen using the stand and making adjustments to the spoke that has the most runout, but fail to say at what point in the build is this being done. I see that others have been looking for a better video of the stand in use. Thanks for responding and have a great day